Tuesday, May 28, 2013

mangoDATE

it's like a "date" with a mango...on your plate! :O  

mangos, love em' & it's mango season somewhere... 

i am particularly fond of the champagne mango, just like the little yellow gem pictured below...but any ole' mango will do.  (country love song about mangos.)
this salad is sweet, savory & it won't leave you hungry!   

one thing i have learned with rob, is that if i am going to serve salad for dinner...then it better be filling!  not because he will bark about it, or anything, but if the salad is not filling... 20 minutes after dinner he'll be rummaging through the refrigerator, looking for dinner #2.  (choices may include, but are not limited too: ice cream, sugar cereal, meat &/or cheese) 

& really, i want it to be filling too!  i want to feel satisfied, nourished & content when i'm done eating...otherwise, i too, will have my head in the refrigerator 20 minutes later!   however, i'll be looking for dark chocolate, dark chocolate & dark chocolate!
ingredients.
butter lettuce or spinach works too
mango
avocado
sweet potato
beets
quinoa or brown rice
dates
cashews
cracked pepper
vidalia onion and cilantro dressing (i used cindy's kitchen found at WholeFoods)

grilled chicken if desired.
directions.

heat oven to 350 & slice sweet potato 1/4"thick or less slices.  place the sweet potatoes slices onto oven safe parchment paper on cookie sheet.  add crushed black pepper to taste.  we like 'em peppery!  place in oven and bake until they start to get golden brown, moving them around & flipping them during this time helps too.  the amount of time really depends on how you slice them (thick or thin) and how you like them cooked.  we like ours a little thicker, but crispy around the edges...so i leave them in for about 25-30 minutes.

(rob) grills the chicken breasts if, he's having chicken.

prepare the quinoa or the brown rice according to the directions.  

prepare the beets by boiling them in water until tender, run under cold water, peel & slice.  or you could use a preservative free already prepared or marinated beet.  i am currently really loving, or slightly addicted, to these little baby beets by LoveBeets, this salad is great with their "sweet fire" infused beets...again found at WholeFoods.

peal mango & avocado, then slice, along with the dates.

next,  place all of the ingredients on a plate however you choose!
notes.
*the sweet potatoes do not need any olive oil, they cook up nicely without.  just make sure you are using the oven safe parchment paper, so that you don't have any "sticking issues".  also, the potatoes prepared are an amazing addition to other meals, we love them & eat them weekly with something or other!  yummy as a snack too.

*if you are unable to find the dressing i suggested, a good preservative free, poppyseed dressing would be lovely too!  or heck, get crazy & experiment with your own selection, or you could even make your own.  (personally, i save that sort of thing for weekends when i have more time)

*i really like the tangy/acidity that a marinated beet adds to the salad.  a fresh cooked beet tastes amazing too, but it will be more earthy...however,  equally good!

*i didn't add amounts above, as this salad could be adapted for side salads, or for a large group.  i did however, use the following amounts for rob & i to each enjoy one large dinner size salad.

1 head of butter lettuce
1-11/2 small mango
1 avocado
1 large sweet potato
1 large fresh beet or 3 small marinated beets
3/4 cup rice or quinoa
3 dates
some cashews 
cracked pepper to taste on the sweet potatoes
dressing to taste.

& enjoy! e.


Tuesday, May 21, 2013

collardCHILADAS

...these ain't your mamma's enchiladas!

it's our "mexican food fix" all wrapped up in a big leafy green!


sometimes we just HAVE to HAVE mexican food.  we love it, we crave it...and so i make it!

which is exactly how these goody, goodies came to be. 

they are flavorful, saucy and completely satisfy our craving too!   

in fact, rob likes them sooooo much he wears a sombrero when he eats them! ;)


ingredients.
5-6 large collard greens
1 can refried beans (i use amy's organic/low sodium)
1 cup brown or wild rice (i use lundberg wild blend, it's so good)
1 small/medium red bell pepper diced
1 small white onion diced
1 small zucchini diced
1 can mild diced green chilies
 shredded mexican cheese
enchilada sauce (i use frontera red chile enchilada sauce)
fresh cut salsa
plain greek yogurt
avocado

buffalo meat (for the robs in your life) 


directions.
prepare the rice, as directed.  the rice i use takes about 45 minutes, so plan accordingly.  

dice red pepper, zucchini & onion.  also, open up the beans, green chilies, cheese, enchilada sauce and set all of them aside.

i also, brown the buffalo meat for rob at this time, drain it & then set aside too.  

heat oven to 350/375.

bring approx. 11/2"-2" of water to a boil in a large pot.  this is for the steaming of the collard greens, so they'll need some room.  once the water comes to a boil, turn it down to low and place the collard greens in the pot & place lid on top.  (i cut off the bottom & thickest part of the stems from the collards so they will bend a little easier).  let the collards stay in here until steamed enough that they soften & would be "roll-able", but not boiled or over steamed.  it doesn't take long, just a couple minutes.  keep an eye on them, as over cooking is not desired.  once they reach this point. remove them from the heat.  you may even want to run them under cold water, as you are going to handle them now.

place a collard green on the cutting board & slice a "V" like section out of the bottom, removing a little bit more of the thickest part of the stem.  (see image below, the tall picture on the left)  this will be helpful when rolling & folding.


next place a little bit of each ingredient on the collard, along the "spine" (see images above, top right).  i start with the beans, then the rice, the meat (for rob), red peppers, zucchini, onion, some green chilies, then a little bit of cheese & a dollop of the enchilada sauce on top.  & then roll it up long ways (see image above, bottom right), fold in the sides & then place "spine up, end folds facing down" into a baking dish.  

i then poke holes in the tops of the collardCHILADS with a knife.  next, top all of the rolled up collardCHILADAS with light cheese, a tiny bit more red pepper, onion & green chilies...then add  enchilada sauce over the top!

place in the oven & cook until cheese is melted & it has heated all the way through.  i like to let the cheese get a little browned and crispy on the ends, but that's just my preference. 

remove from the oven & let sit for a few minutes, as they will be hot, hot, hot.

next, plate it and top with fresh cut salsa, plain greek yogurt & avocado!


notes.
*you could also make these with ground turkey meat, which i have done before too.  rob, likes both, however, buffalo meat is more similar in taste to hamburger, it's leaner, has less fat and is also slightly higher in iron & B-12.  although turkey would be even leaner, all depends on what your going for & what you like.

*i personally, love these & am completely satisfied with the meat free version.  i just add more beans & rice to mine

*they also good topped with a little bit of diced cucumber

*if you have never substituted plain greek yogurt for sour cream, you are in for a real treat & you may never go back!  it's amazing!

*these are delicious the next day too!  the flavors rrrrrreally come together overnight.


enjoy! e.


Thursday, May 16, 2013

mangoMINT


delicious, smooth & creamy!

refreshing mango & mint, smoothed out and balanced by the avocado & banana.  it's a taste bud explosion of yumminess!  ...practically whisks you away to somewhere tropical with white sandy beaches, palm trees, ocean air & speedos. ummm, what?  i mean espadrilles, espadrilles! ;) 

okay, back to reality.  & this smoothie!


ingredients.
1 small mango. (approx. 3/4 cup)
1 banana, frozen
15 large mint leaves (if smaller, adapt accordingly)
1 ripe avocado
1 cup vanilla almond milk, or light coconut milk! :)


directions.
place all of the above into a vitamix or high powered blender & blend until smooth & creamy.  transfer into serving glass of your choice and garnish with fresh mint leaves!  

notes.
*serving size for ingredients listed above = one.

*great add on ingredients are:  1tsp maca powder &/or  1 tbsp chia seeds 


& lastly...

enjoy! e.
Monday, May 13, 2013

spinachARTICHOKE


& it's not a dip, it's a dish.

...for dinner!

we like it so much that we've had it the last two weeks for dinner.  well, not every night, but one night each week!  ..& rob pretty much wants to drink the sauce, so i think he's pretty into it too;) 

this recipe came together at the grocery store the other week because i was genuinely inspired by the beautiful organic spinach and just had to create something with it!  so i went with it, selecting a few more ingredients that sounded like good additions to the spinach.  however, with any "great" idea when it to comes creating recipes, you never know if it's going to end up being as delicious as the idea in your mind....but this one worked out & it will definitely be repeated again & again!  ...although, maybe not next week! ;)


the ingredients pictured above are for the sauce.  ...sauce for the pasta that is!  & for clarification purposes the ingredients are:  artichokes, flat parsley, vegetable broth, milk, cheese, garlic, chia powder, spinach & lemon juice.  these ingredients keep the pasta light & fresh, perfect for an easy spring dish or a yummy side to some BBQ!  & i am thinking, this recipe may even be good cold too, although i have not tried this...so if it doesn't taste good, then i never suggested it! :)


so that's the simplicity of the sauce! the other ingredients, which are few,  are pictured below.  portabella mushroom caps, onion, quinoa pasta & carrots.  


curious about quinoa pasta?  it is very tasty and offers a healthy nutrient rich alternative to regular pasta noodles.   quinoa pasta offers the same benefits of quinoa (which i have written about before) but as a quick refresher...it's a complete protein, rich in fiber, vitamins & minerals! i find it at whole foods & at heinen's (our local grocer) in the health food section.   i'm not sure if rob even knows that he is eating quinoa pasta?  and if he doesn't, well, i guess he does now... "hi honey, i hope you'll still eat it, you have really been enjoying it!"xo. -cheesy grin :)


ingredients.
3 cups spinach  
1 can whole artichokes (drained)
1/3 cup flat parsley
1/2 cup vegetable broth
3/4 cup milk 
1/4 cup parmesan 
1/4 cup asiago
1/4 cup romano
2 cloves garlic
2 tbsp. chia powder
juice of 1 lemon
3/4 cup onion chopped
3 large portabella mushroom caps chopped
1 tbsp olive oil
shredded carrots
1 box quinoa pasta spaghetti noodles

directions.
chop portabella mushrooms & onion, saute in olive oil until softened and brown.  

next, add spinach, artichokes, parsley, veggie broth, milk, parmesan, romano, asiago, garlic chia powder and lemon juice to vitamix (or other high powered blender, etc)  and blend until it is a creamy yummy sauce.  the wonderful things about the vitamix is that if you blend it on high for long enough it heats it up too, actually making the sauce blended & hot right then!  if you do not have a vitamix, you may have to blend and then heat the sauce on the stove.  

boil the water & add the quinoa pasta cooking as directed on the package. 

once all of the above are complete.  place pasta in a large bowl, add the mushrooms & onions, some sauce & mix together.  i just feel it out on the sauce, not adding it all, just enough to coat 1 box of the quinoa pasta.  we like ours on the saucier side.  

next, place the mixed pasta in individual bowls & top with shredded carrots.  & if you like, sea salt & a little pepper to taste!

notes.
*again, if you do not have a vitamix, you will need to adapt the blending & the heating of the sauce to suite your kitchen.

*i let the sauce sit in the vitamix for little bit before adding it to the pasta.  this allows it to thicken up a bit, due to the chia powder.

*when i had the idea for this recipe at the grocery store, i was thinking just parmesan cheese, but when i got home i realized that i had grabbed a 3 cheese mix of asiago, romano & parmesan.  & it worked out beautifully!  however, you could experiment with just parmesan or any combination of the the 3, as long as it ends up equaling 3/4 cups total, for the cheese combo.  

*you will have sauce left over with the recipe above, the amounts i listed above are enough for rob & i.  about 4 servings.

*you can use the extra sauce for other things.  last week when i made this, i used some of the extra sauce drizzled over eggs for breakfast the next morning & it was mmmm....mmmmm....good!  

*i added grilled italian chicken sausage to rob's serving(s).   ;)


peace, love & pasta!

enjoy! e.


Wednesday, May 8, 2013

easyGREEN.

greenJUICE.

...it looks like you are drinking grass clippings & it can taste great too!

maybe you are already incorporating green liquid wonders into your daily regimen via juicing, blending or green smoothie making, if so, AWESOME!  carry on!  :)

however, if you're not currently into green drinks, it may be something to consider trying. greenDRINKS are an awesome way to add healthy, vibrant, nutrient rich leafy greens & goodness into your life!

i titled this post easyGREEN because these two recipes are simple & tasty introductions into the world of greenJUICE (i'm talking about blended juice specifically here).   because over the years, let me tell you, i have tried & concocted some nasty tasting combinations (trial & error in full effect), so by putting these out there i am hoping to save you a couple of "yucks"! 

i truly love my juicer & it has served me well over the years, however, i am currently having a love affair with my blender.  also, i think it's important to know that you don't need a juicer in order to create healthy green drinks.

with blending, you ingest all of the fiber from the produce, because you are eating the leaves, the stems, the skin, etc.  also you don't have to use as much produce when blending, which is a little easier on the budget!  not to mention the clean up is a breeze AND you are still absorbing so many nutrients!

and when it comes to nutrients i think dark leafy greens are the key to greenJUICE!  a few of my favorite dark leafy greens are:  kale, spinach, collards, watercress & swiss chard.  they are packed FULL of so many vital nutrients including; calcium, magnesium, iron, potassium, zinc and vitamins A, C, E and K, fiber, folic acid, chlorophyll and so much more!!!  

and with so many nutrients, comes so many potential benefits...

*blood purification
*improved circulation
*strengthened immune system
*promotion of subtle, light and flexible energy
*mood booster 
*promotion of healthy intestinal flora
*cancer prevention
*improved liver, gall bladder and kidney function

pure leafy green awesomeness!!!  


spinachCELERY.


ingredients.
3-4 handfuls of spinach
1 large banana
2-3 celery stalks
1/2 cup orange juice 
1/2 cup water
handful of ice
1tbsp chia seeds


directions.
place all of the above in a high powered blender & blend. (i use a vitamix)

notes.
if you are new to greenJUICE and feel as though you need to sweeten it up a bit more than the recipe calls for, you could do so by simply adding more banana or by using 1 cup orange juice (instead of 1/2cup water & 1/2cup orange juice).  a half of a pear would also be a nice addition to this one!  then as your pallet adapts to the greenGOODNESS you can reduce the fruit amounts if you choose.  


kaleCUCUMBER.


ingredients.
3-4 large kale leaves
1/2 apple
1/2 cucumber
1/2 cup orange juice
1/2 cup water
handful of ice
some parsley (a little goes a long way)


directions.
place all of the above ingredients into a blender and blend.

notes.
again, if you feel as though you need to sweeten it up a bit more than the recipe calls for, you could do so by simply adding more apple, more carrot or by using 1 cup orange juice (again, rather than 1/2cup orange juice & 1/2cup water).  then as you drink more greenJUICE you may reduce the fruit amounts, if you choose.  


and as always, experimentation is encouraged!  however, i will definitely be posting more tasty & nutrient rich greenDRINKS as time goes on.   

have a beautiful day!

enjoy. e.


Friday, May 3, 2013

overnightOATS.

overnightOATS.

maybe you have heard of them, maybe you have seen them and maybe you've even tried them....

they are super duper simple and they are amazing for grabbing on the fly...in the morning or for a "hearty" (& heart healthy) snack throughout the day.

and who doesn't love oatmeal?  (okay, so not everybody loves oatmeal, but we sure do!)  

it's rich in fiber, great for lowering cholesterol & high blood pressure...making it an overall awesome food for heart health!  the fiber also assists in stabilizing blood sugar, supports healthy digestion & even helps boost your immune system!  

again, this is one of those things that i make ahead of time...simplifying the breakfast thought process!  
it's the prep i tell ya!  the prep!  ...it works! :)

i concocted these four flavor combos for overnightOATS, in order to suit our tastes and thought that you might enjoy them too.


blueberryPEACH.
1 cup rolled oats uncooked (not the quick kind)
1 cup almond milk (i used unsweetened vanilla)
1/2 cup blueberries
1 peach chopped
1/2 tsp of vanilla
light drizzle of honey


bananaPB
1 cup rolled oats
1 cup almond milk
1 banana sliced
1-11/2 tbsp peanut butter
1/2 tsp raw cacao
1/2 tbsp chia seeds


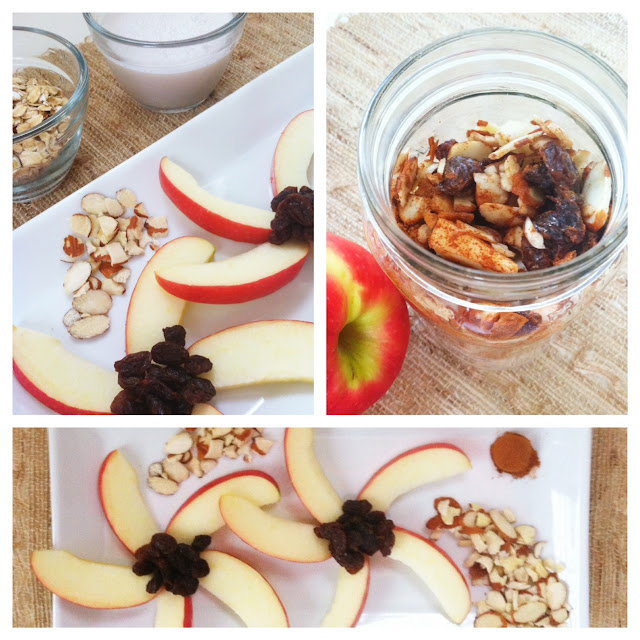
appleALMOND.
 1 cup rolled oats
1 cup almond milk
1/2 of an apple chopped
1 tbsp raw shaved almonds
1 tbsp raisins
1/4 tsp cinnamon
drizzle of honey


pineappleMANGO
1 cup rolled oats
1 cup almond milk
1 pineapple ring chopped
1/2-3/4 of a small mango chopped
1 tbsp shredded coconut (unsweetened)
1 or 2 dates diced


directions.
it's so simple, i hesitated to even include directions.  just throw all of the ingredients into a small mason jar, a piece of tupperware, a glass container or whatever you have.  put the lid on,  give it a little shake & into the refrigerator it goes...overnight!  & in the morning, whaaaalaaaaa!  a yummy cereal with your name on it!  :)


notes.
 i do recommend putting the oats in first, so they're at the bottom (especially if you use these small mason jars).  even after you shake it up the oats pretty much stay on the bottom, along with the almond milk that settles there too.  this way the almond milk can absorb into the oats & soften them!

you may even find in the morning that you want to add a little more milk, or not, depends on your preference.

also, it's always fun to experiment with different flavor combos on these, depending on your tastes or just by using what you already have in the house!  

& lastly, what would a recipe post be without the robFACTOR?!?! ha!  i'll just keep it simple & say that...he ate two, in a row, for lunch! :)


enjoy! e.